

Sunday, November 29, 2009

Not as planned
This morning I went outside to unveil the centercase parts that had been glueing overnight. Once I had the plastic covering off and the clamps all put away, I noticed a big mistake. You might be able to see from the pictures in the last post. What happened in my frenzy to glue-up and take pictures of it I managed to make two identical pieces. With the seat supports glued on the same side of each panel instead of on the outside faces of each panel. Not sure of how to un-glue epoxy I pulled out my power hand planer and worked everything down till I was at the plywood panel, then some scraping and sanding finished the job, I cut new pieces and glued them on to the right side this time. Lesson learned. Other then that I managed to fiberglass the other inside surface of the centercase and glue the end pieces on to that one. Not a completely lost day.
Saturday, November 28, 2009
Leading up to the scarf
In anticipation of loosing shop space once the jig is fully set up and the bottom panel is attached I have been trying to get as much of the bulkheads and centercase completed beforehand. I now have all the bulkheads ready for placement except the transom. The seat fronts are cut. All my 1"x 6" rough cut Douglas fir has been dressed. I borrowed a thickness planer to do this then on the table saw cut the keel batten and all stringers. I have taken a risk and glued bulkheads four and five together with their braces. The risk is that if not properly measured they will be out of alignment when fitted to the bottom panel and centercase. All of the pieces for completing the assembly of the centercase are cut. I have also decided to fiberglass the inside of the centercase, this will have to be done before the final assembly stage. Once it is put together there wont be enough room to do anything inside. The centercase is a big job, since there are many pieces that need to be attached. They all can't be attached at once, some on the inside some on the outside. Each gluing faze needs 15 hours for the epoxy to cure. Patience!!! This is all leading to the bottom panel and the joining of two full sheets of plywood with a scarf joint. -My excuse is the shop space, I think I am actually avoiding getting on with the scarf joint. An eight to one angle cut along the end of each sheet of ply then mated and glued. The result is a four foot by 16 foot sheet of plywood.
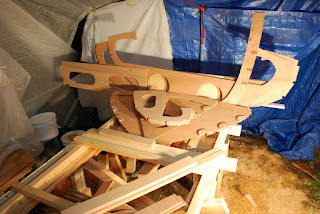


The parts pile

The Measuring pumps make it a nice product
to work with. The pumps automatically give you
the right ratio.

Clamping in the form of weight.

Keeping an eye on the tempurature while waiting
for the epoxy to cure.

Sunday, November 22, 2009
Time well spent
Surprisingly enough I think this has been the first weekend that I have been able to spend a good amount of time working on the boat. Up till now it has been after work during the week. Over the last few days I have been able to get the doublers on bulkheads one and two and the stem glued up and notched. I also have the port holes and ventilation holes cut out for these. I am super happy that I'm going to be able to work ahead with the epoxy using a lamp and plastic sheeting to keep the temperature up. That could potentially take a few months off of the overall build time. YAY!!!


Stem and First three bulkheads.

Stem Glue up. It was twenty degrees Celsius
under the plastic.
Subscribe to:
Posts (Atom)
